Saturday, November 30, 2013

Pumpkin Cranberry Granola | Healthy Breakfast Recipes

After the success of my Pear Granola recipe, I have been making granola at home quite often with fresh fruit purees and Kavin's leftover store-bought fruit puree baby foods. Every time I try with a different nuts and sweetener combination. 
When most people love and wait eagerly for the spring season, somehow my favorite one is the autumn or the fall season. I love orange, orange everywhere starting with the falling leaves, persimmons, sweet potatoes and of course pumpkins. This pumpkin cranberry granola is another one on the line celebrating the fall season.
Ingredients:
Serves - 6
Rolled Oats - 3 cups
Roasted Pepitas - 1/2 cup
Cranberries - 1/2 cup
Cinnamon (ground) - 1 tsp
Ginger (ground) - 1/2 tsp
Salt - 1/2 tsp
Pumpkin puree - 2/3 cup
Olive Oil - 2 tbsp
Maple Syrup - 1/4 cup
Brown Sugar - 2 tbsp (optional)
Method:
Preheat the oven to 300 F/150 C. Line a large baking sheet with parchment paper. Mix the pumpkin puree, cinnamon, ginger, salt, oil, maple syrup and brown sugar (if using). Pour over the oats and mix well. Spread on the baking sheet and bake for 50 minutes. Pull out the baking sheet every 10 minutes and mix the oats with spoon to allow even cooking. In the last 10 minutes, fold in the pepitas and cranberries. When done, allow to cool in the baking sheet. The oats crisp up when cooled. Serve for breakfast with yogurt or milk.
Linking these up for Vegan Thursdays!

Celebrating 3 years of blogging with an Event and a Giveaway!

Time flies. How true? This December I am completing 3 years of blogging. Though it may sound like cliche, I never thought I could make it this far. This blog has been my hobby and companion whenever I wanted to spend time usefully or just laze away. It has grown with me through my pregnancy, childbirth and my kid's first birthday. This blog has given me many friends and quite a few memories. I am celebrating this moment and always thankful for everyone in my life.
Happiness is meant to be shared, right! I am sharing in the form of a giveaway. One lucky winner will be selected at the end of the event to receive a cookbook "Dakshin - Vegetarian Cuisine from South India" by Chandra Padmanabhan. 
And now for the event details. I believe everyone will be in a holiday mood and baking away tons of cookies and cakes. To be a part of my event, just link them up. 


Rules for the event:
1. Link up all your holiday baking viz. cakes, cupcakes, muffins, scones, cookies. Eggs, no eggs anything is fine.
2. The recipe post should be linked back to this announcement page.
3. Send in any number of new entries posted from now until Jan 5th, 2014. 
4. Any one can participate, but only entries from US and India are eligible for the giveaway.
5. Non-blogger are also eligible for the giveaway, just send me your recipes with picture of the bake to krithiskitchen[at]gmail[dot]com.
6. Like my Facebook Page Krithi's Kitchen and follow me through Google Friend Connect.
7. After linking your entries leave a comment here.
8. Winner will be announced in the 2nd week of January.
Come on people, don your baking caps and link up some scrumptious entries.

Thursday, November 28, 2013

Murungakeerai Adai / Lentil Moringa Pancakes | Idli Dosa Recipes

Back home in India we had a drumstick tree in our backyard. Well, pretty much every tree in there, Mango, lime, coconut, jamun yielding a bounty of organic produce. We also had curry leaves, tulsi, hibiscus plants. The memory of eating drumstick leaves was almost forgotten, until I spotted this little pack of drumstick leaves in my Indian produce shopping last time. I picked up one thinking of making these adais which DH hearts and is a part of MIL's recipe book to him. I tweaked the recipe a little and arrived at this tasty dosa variety.
Ingredients:
Measurements in rice cooker cup - 160 ml; Makes 16 adais
Idli Rice - 3 cups
Toor dhal - 1 cup
Chana dhal - 1/4 cup
Murunga keerai / Drumstick leaves / Moringa - 1 cup - loosely packed
Dry Red chillies - 10 (see notes below)
Black Peppercorns - 1 tsp
Cumin seeds - 1-1/2 tsp
Asafoetida - 1/2 tsp
Grated Coconut - 1/2 cup - loosely packed
Salt - to taste
Method:
Wash and soak the rice and dhals together in plenty of water for 4 hours. Soak the dry red chillies in a separate bowl filled with water. Clean the murunga keerai, reserve only the leaves and discard the stems and twigs. Wash to remove any dirt. In the wet grinder, add one cup of the soaked rice-dhal mixture with chillies, peppercorns, cumin, asafoetida and coconut. Grind well, and add the rest of rice after 2 minutes. Grind coarsely into a rava like texture. Remove from the grinder and mix the salt and drumstick leaves. Heat a dosa tawa and pour about 1/2 cup of the batter and make dosas. Spray some oil and flip when the edges turn red. Cook for another minute and half and remove. Serve hot.
Linking this to Taste of the Tropics - Chilis.

Tuesday, November 26, 2013

Keerai Kootu / Spinach Moong Dhal Stew | South Indian Curry Recipes

Keerai kootu is a simple, earthy and healthy side for a spicy kulambu. Packed with protein and plenty of nutrients this spinach moong dhal stew is a perfect combo for chapathis also. I buy this big bag of Spinach from Costco and I love to include spinach in our meals in many forms. Spinach Chickpea pulao, Spinach chutney, Spinach Pesto and Paneer Spinach Pinwheels to name a few.


Ingredients:
Serves - 4
Spinach - 5 cups - tightly packed - chopped
Yellow Moong Dhal - 2 tbsps - heaped
Onion - 1/4 cup - chopped fine
Dry red chillies - 3
Mustard seeds - 1/2 tsp
Urad dhal - 1/2 tsp
Curry leaves - a few
Turmeric powder - a pinch
Salt - to taste
Method:
Wash the moong dhal and boil in 1 cup of water with a pinch of salt. Cook until the dhal still holds the shape but completely mashed when pressed between the finger tips. Set aside with the cooked water. In a kadai, heat oil and temper the mustard seeds, urad dhal, curry leaves and dry red chillies. When the mustard splutters, add the chopped onion and saute until transparent. Add the spinach and mix until it wilts. Continue cooking until the spinach is completely cooked. Add salt to taste, turmeric powder and the cooked dhal with water. Mix well and allow it to come to a boil. Remove from heat and serve as a side for rice or roti.

Saturday, November 23, 2013

Manga Vathal Kulambu / Dry Mango Tamarind Curry | South Indian Curry Recipes

Packing stuff to bring from India when on vacation is always an exciting thing. Apart from nice Indian dresses for us, I also pack things we do not get here. Grandma's onion pickle, MIL's home made fryums and aunt's multi-purpose spice powder. This time MIL also asked me if I want to take the manga vathal (sundried mango pieces). I was not sure what to do with that, until DH insisted me to pack that to make vathal kulambu. Apparently, he loves manga vathal kulambu very much. I bought 2 packets and still have a little left after making this vathal kulambu few times.

Ingredients:
Manga Vathal / Dried Mango pieces - 1/4 cup - about 6-7 pieces
Gingelly oil - 1/4 cup
Fenugreek seeds / Vendhayam - 1/2 tsp
Pearl onions / Sambar onions - 20 - peeled whole
Garlic - pods from 2 heads - approx 25 cloves
Curry leaves - a few
Chilli powder - 1 tsp
Coriander powder / dhaniya - 2 tsps heaped
Turmeric powder - 1/4 tsp
Tamarind - size of a small lime - soaked in water and juice extracted - about 2 cups
Water - 2 cups
Hot water - 1/2 cup

Method:
Soak the dried mango pieces in hot water. Heat oil in a kadai and add the fenugreek seeds and curry leaves. After about half a minute add the peeled whole pearl onions and garlic cloves. Cook in medium-high heat until the onions are three-fourth cooked. Add the spice powders and fry for a minute. Add the tamarind extract, salt and the water from the mango pieces. When it comes to a boil add the mango pieces. Reduce the heat and simmer for a good 45 minutes, stirring occasionally. Remove from heat and serve hot over steamed rice. Keerai kootu or pappad are best combos.
Notes: This kulambu can be stored for upto a week in the fridge, if it lasts that long for you. Remember to use clean, dry spoon every time.

Thursday, November 21, 2013

Carrot Mutta Podimas / Carrot Eggs Stir Fry

How do you increase your protein intake? Eat eggs if you can. How do you give protein to the one who doesn't eat eggs (read as don't want to)? Sneak up with something they eat. Again this method doesn't even work the slightest in DH. He can smell eggs even from a mile away. This is for the little one who I am training to eat eggs. He likes the taste but just can't stand the texture. There are only a few ways he can eat eggs, like this poriyal here mixed with rasam or curd rice. Or like in this kulambu mixed with rice.
Ingredients:
Serves - 3
Carrots - 4 - medium sized (shredded)
Eggs - 2
Oil - 2 tsp
Mustard seeds - 1/2 tsp
Urad dhal - 1/2 tsp
Curry leaves - a few
Garam masala - 3/4 tsp (Can substitute curry powder)
Method:
Heat oil in a skillet and splutter the mustard seeds, urad dhal and curry leaves. Add the grated carrots and fry in medium heat until it is cooked through. Add the garam masala, salt and saute for a minute. Crack open the eggs into the skillet and mix with the carrots. Continue cooking by stirring the mixture around until the eggs are scrambled and cooked. Serve as a side or as a filling for a sandwich. Also goes good as a stuffing for a khatti roll.

Tuesday, November 19, 2013

Chocolate Banana Marble Bread - Eggless | Muffins and Quick Bread Recipes

When life gives you lemons, make lemonade... When it gives you bananas, make banana bread. I had quite a few ripe bananas sitting on the countertop with no takers. When it comes to banana bread, the hubby approved recipe is already on my space. He wouldn't allow me to change it. But I wanted to use these bananas to make a banana bread. I also wanted to make a quickbread with the "marble" effect ever since I saw in the blogosphere months ago. It is just that I never got into making it, I never got the chance to try something new. I know, I know being a food blogger is all about trying new things. But with a toddler the daily activities itself become overwhelming sometimes with all the extra tidying up. This time we were visiting one of our family friends and I dared to make the much needed venturing to create the marbled bread, undoubtedly I manage to squeeze in this when the home was in pin-drop silence (read as kid sleeping).
Ingredients:
Recipe Adapted from here
Makes - 1 loaf - 12 slices
All purpose flour - 1-1/2 cups (Substitute Whole wheat flour for a healthier version)
Salt - 1/2 tsp
Baking Powder - 1/4 tsp
Baking Soda - 3/4 tsp
Ground Cinnamon - 1/4 tsp (optional)
Oil - 2 tbsp (see notes below)
Brown Sugar - 1/2 cup (You can substitute any granular sweetener of your choice)
Low fat milk - 1/2 cup
Vanilla extract - 1 tsp
Mashed Bananas - 1 cup - approx 3 medium sized bananas
Cocoa powder - 3 tbsp
Hot water - 3 tbsp


Method:
Preheat the oven to 350 F/ 180 C. Grease and line a loaf pan with parchment paper. Mix the dry ingredients (the first 5) with a whisk. In another mixing bowl, whisk together the oil, sugar, milk and vanilla until the sugar is dissolved completely. Add the mashed bananas and mix well. Add the flour mixture little by little and incorporate into the wet mixture using the whisk. Do not overmix. Mixing just until most of the flour mixture is absorbed is fine. Now divide the batter into, well not accurately, just eyeballing would be fine. In a small bowl mix the cocoa powder and hot water until smooth. Add that to one part of the batter and mix. Now, in the batter. In the prepared loaf tin, add 2 tablespoon measures of the batters alternatively to form a checker board pattern. For a visual guide check out this link. After all the batter is used up, use a knife, back of a spoon or the back of a wooden spatula to make swirls in the batter. A simple "S" pattern all over would be suffice. Bake for about 50-55 minutes. Allow to cool in the wire rack for a couple of hours. Serve warm or chilled.
Notes:
You could use melted butter or any oil you prefer. 
Linking it up to Srivalli's Cake Mela; Flavours of USA & Canada; Vardhini's Bake Fest #25.

Sunday, November 17, 2013

Pumpkin Spice Latte / Pumpkin Spiced Instant Coffee

The market is brimming with pumpkins and the food blog world is abuzz with pumpkin recipes. I am a little late this year with my pumpkin recipe for the season. I wanted to make and post my favorite pumpkin recipes of the fall. Pumpkin Spice Latte.. Now this here is not a traditional recipe since I have used instant coffee powder instead of espresso. But I like it that way. If you are a fan of Pumpkin Spice Latte like I am you would love this.
Previous Years' Pumpkin Recipes - Pumpkin Pasties; Pumpkin Cranberry Scones.
Ingredients:
For the Pumpkin Spiced Syrup
Pumpkin Puree - 1/2 cup
Water - 1 cup (reduce to 3/4 cup if using home made pumpkin puree)
Brown Sugar (packed) - 1/3 cup
Ground Cinnamon - 2 tsp
Ground Dry Ginger - 1 tsp
Ground Cloves - 1 tsp (use 1/2 tsp if grinding fresh at home)
Ground Nutmeg - 1/2 tsp (use little shy of 1/2 tsp if grinding fresh at home)

For Pumpkin Spice Latte with Instant Coffee Powder
Makes - 2 servings
Milk - 1-1/3 cups (See Notes below)
Pumpkin Spiced Syrup - 2/3 cup
Instant Coffee powder - 3/4 tsp (this is for 2 servings. Adjust according to desired coffee strength)
Method:
Mix all the ingredients for the syrup in a saucepan and heat in medium flame. When it starts bubbling, remove from heat and allow to cool.
Heat milk until warm and mix with pumpkin spiced syrup and coffee powder. Mix well until the coffee is distributed well. Serve hot topped with milk foam or whipped cream.
Notes:
I tried to sweeten the syrup with agave but I personally loved the syrup with good ol' sugar. You could make latte immediately after the syrup is done.  But I personally liked it after 2 days when all the spices meld and give a wonderful flavour. The Pumpkin spice syrup can be stored for upto a week in the refrigerator.
I used low fat milk. Whole milk or half and half or a combination of both can be used. No sugar/sweetener is needed for the latte since the sugar in the syrup should be good. 
Linking it hot to Flavours of USA & Canada.

Friday, November 15, 2013

Coriander Rice / Kothamalli Sadham | Indian Rice Recipes

I would always try to clean up my fridge before I go for produce shopping. I confess, I am not a "meal planner" who carefully drafts out every single meal of the week. I have a visibility and plan for two days max. After that I plan for the next two days with the leftover produce. I was going through the vegetables rack and found this little bunch of coriander leaves (cilantro) lying around hidden. I was out of most vegetables and there was nothing I could pair 'em with, so I planned for coriander rice for me and Kavin for lunch. It was done in a jiffy and tasted so good that I shared some with my neighbor. Good things are meant to be shared right?!


Ingredients:
Serves - 3; Cooking Time - 30 minutes
Rice - 1-1/2 cups (rice cooker cup)
Cilantro / Coriander leaves - 1 big bunch
Pearl onions / Sambar onions - 10 - peeled and quartered
Salt - to taste
Sesame Oil / Gingelly Oil - 1 tsp + 2 tbsp
Mustard seeds - 1 tsp
Urad dhal - 1 tsp
Curry leaves - a few
For the Spice powder:
Coriander Seeds - 1 tbsp
Chana dhal - 1 tsp
Urad dhal - 1 tsp
Cumin Seeds - 1/2 tsp
Red chillies - 4
Method:
Wash and soak rice in water for 15 minutes. Cook with 2-3/4 cups of water until done and the grains are not sticky. Remove from heat and spread on a plate to cool. Heat 1 tsp of oil and roast the ingredients for spice powder until light brown. Allow to cool and make a fine powder. Puree the coriander leaves with a couple of tablespoons of water. Heat remaining oil in a kadai and splutter the mustard seeds, urad dhal and curry leaves. Add the onions and fry until soft followed by the ground spice powder. After half a minute add the coriander leaves puree and salt. Cook in medium flame until the paste cooks and becomes shiny. Add the cooked cooled rice little by little and mix well with a fork. Serve hot with any curry, raitha or better yet a simple pappad.
Linking this up to Taste of the Tropics - Chilis; PJ's Herbs & Flowers - Season 2.

Wednesday, November 13, 2013

Easy Instant Unniyappam / Banana Kuzhi Paniyaram / Rice Flour Sweet Appam

All fond memories are made through food. Or at least the food enthusiast in me try to connect memories with food. There is a memory associated with these unniyappams. I first tasted unniyappam in one of dad's friends' home when I was around 10. They are a sweet family from Kerala and Aunty would make this every single time when we visited. I still remember how fondly she used to prepare these appams for us kids. Then they moved back to Kerala after Uncle retired and we all moved to different cities for work. But then the world has shrunk these days due to the advent of social media and we have got a chance to reconnect with our old friends. It is through Facebook that we reconnected with their family. I chanced upon to see her daughter, wishing her mother on her birthday. I too conveyed my wishes to Aunty and the foodie in me made a mental note that I have to make her unniyappams one day.
Ingredients:
Serves - 4 for snack
Rice flour - 2 cups
Jaggery - 1/2 cup (tightly packed) - see notes below
Banana - 3 small or 2 big ones - mashed
Salt - a pinch
Cardamom powder - 1/4 tsp
Baking soda - a big pinch
Water - 1/4 cup + more to make the batter
Oil - for frying in the pan

Method:
Mix jaggery in 1/4 cup of water and heat until it is melted. Filter with a fine mesh strainer. Mix the jaggery syrup with rice flour, mashed bananas and water to make a batter of pouring consistency but slightly thicker than dosa batter. Stir in salt, cardamom powder and baking soda. Heat the paniyaram pan / abelskiever pan in medium-high flame. Pour about 1/4 tsp of oil in each kuzhi (indentation). Pour enough batter into each kuzhi to fill. When little bubbles start to appear on the top, flip using a toothpick or chopstick to about halfway. After about another minute, flip again completely. At this stage all the sides of the appam should be golden and well-formed to a round shape. Reduce the heat to medium and continue to cook until the insides are cooked through. Repeat for the rest of the batter.
Notes:
1. The amount of jaggery used here yields a mildly sweetened unniyappam. For sweeter ones use 3/4 to 1 cup of jaggery. The water for making syrup should be 1:2 with jaggery.
2. Traditionally the unniyappam is made by soaking rice and grinding to form a batter with jaggery and banana. Another point to make it traditional is to add small pieces of fresh coconut fried in ghee and black sesame seeds to the batter.

Monday, November 11, 2013

Methi Soy Chunks Zunka - Guest Post for Prathima of Prathi Ruchi

I love getting invited to other people's places. I mean, who doesn't? Today I am going to Prathima's place as a guest. Blogging has extended my boundaries to meet new people and to get to know new cuisines. Prats (as she is fondly known) is a dear blogger friend of mine. We became close with emails and online chats. She is a sweet and genuine person with a passion for cooking, the thing we share. I also admire the way she almost never gets stuck up for words, a boon we bloggers crave for. Here, again I am stuck up without any words for her.. 
She is getting married in November and I wish all happiness in the next phase of her life. Wishing her a Happy Married Life and all Happiness!
Did you know that soy chunks make a great snack. A bowl of simple soy chunks stir fry will make me happy. It is like snacking without feeling guilty. Coming to this recipe, zhunka was something which I have not heard of before I started blogging. As I said before, blogging has extended my boundaries and helped me getting to know various cuisines. Zunka is of Maharashtrian origin and is a simple to make tasty dish. I have already made Okra Zunka, but decided to bring in more flavour by adding dried methi leaves (kasuri methi) to the besan.

Just hop over to Prathima's Space for the ingredients and the complete recipe.


Sunday, November 10, 2013

Kondakadalai Sundal / Chickpeas Sundal with Fresh Ground Spice Paste

Thinking of a quick side which can also be transformed to a snack. Then this one is for you. I love to eat kondakadalai aka garbanzo beans. I mean who doesn't. Amped with spices it makes a great healthy evening snack. I made this last week as a side for spinach masiyal and rice. I and Kavin (for him, I mixed the sundal with white rice and picked out the chana, to remove the heat) loved having this as a side for the earthy spinach masiyal and rice.
Ingredients:
Serves - 3
Chickpeas - cooked - 1-1/2 cups OR 1 can - Click here to know how to make canned beans at home.
Onions - 1/2 of a big one - approx 1/2 cup chopped
Oil - 1 tbsp
Salt - to taste
Spice mix:
Dry Red chillies - 3
Ginger - chopped - 1 tsp
Garlic - 1 clove
Tempering / tadka: (optional)
Mustard seeds - 1 tsp
Urad dhal - 1 tsp
Chana dhal - 1 tsp
Curry leaves - a few
Method:
Pulse the ingredients for spice mix for a couple of times in the small jar of mixie/blender to make a coarse paste. A mortar and pestle also works fine. Heat oil in a saute pan and splutter the ingredients for tempering. Add the onions and saute in medium-high heat until transparent. Add the ground paste and fry for another minute. Add salt to taste and the drained cooked chickpeas and mix well. Remove from heat after 2 minutes. Serve as a side/snack.
Notes: A tbsp of grated coconut can be added at the end before removing from heat.
Linking this to My Legume Love Affair event by Lisa and Susan; Taste of the Tropics - Chilis.

Thursday, November 7, 2013

Szechuan-Style Tofu and Mushroom with Peanuts | Vegan Chinese Recipes

For all the Tofu lovers out there, this recipe is for you. And for all the Tofu non-lovers you should really try this recipe once. Some think the taste of tofu is just bleh.. But honestly that attribute of tofu is what is really good in it. How? you may ask. Tofu absorbs flavors really beautifully no matter what dish it is used in. Bake it, Saute or Fry, it is always a winner. Make it spicy or make it tangy, it tastes awesome either way. I have a long list of dishes I use tofu in and love it in each form.

Ingredients:
Adapted from Cooking Light - way to cook Vegetarian cookbook
Serves - 2-3
Tofu - extra Firm - 1 block - pressed and cut into 1" pieces
Mushroom - 12 oz - 300 g - sliced
Carrots - julienned - 1/2 cup
Bell peppers (I used yellow and orange) - julienned - 1/2 cup
Roasted peanuts - 1/4 cup - coarsely chopped
Oil - 1 tbsp
Ginger paste - 1 tbsp
Spring onion whites - 1/4 cup
Spring onion greens - 1/4 cup
For the Sauce:
Water - 1 cup (Can substitute vegetable or chicken stock)
Corn Starch - 1 tsp
Chilli paste - 1 tbsp
Soy sauce - 1 tbsp (Low sodium)
Garlic - minced - 1 tbsp
Method:
Preheat the broiler and place the oven rack in the middle of the oven. Line a baking sheet with aluminium foil and grease with oil. Place the cut tofu pieces and broil for 10-12 minutes, turning once or twice in the middle. Mix the ingredients for the sauce and set aside. Heat oil in a large non-stick pan and saute the mushrooms. When the mushrooms start to release liquid add the carrots, green onion whites and ginger. After about a minute add the bell peppers, salt and fry for another minute. Add the sauce and allow to heat for about 2-3 minutes or until it begins to thicken. Add the tofu and spring onion greens, mix and remove from heat. Garnish with peanuts before serving. Serve hot with steamed rice.
Notes: Instead of broiling, the tofu can be pan-fried until golden.

Monday, November 4, 2013

Pasta with Mushroom, Rosemary & Lemon | Vegan Pasta Recipes

It was one of those afternoons when it was just me for lunch. It was the week before Diwali and I was busy preparing sweets. So I did not want to make an elaborate lunch. I had made carrot dhal rice for Kavin and was thinking of making some quick pasta dish for my lunch. A quick fix for lunch just for me would be some whole grain pasta with some vegetables thrown in with few other simple flavours. This time it was Pasta with mushrooms and herb infused olive oil. Rosemary, garlic and lemon are those simple ingredients which I used to lift up my mood and gear me up for the whole afternoon of diwali snacks-making.
Ingredients:
Serves - 1; Total time - 15 minutes
Soba Noodles / Whole Grain Spaghetti - 1 bundle/ 2 oz
White Whole Mushrooms - 10 - sliced thick
Extra Virgin Olive oil - 1-1/2 tbsp
Fresh Rosemary - 1 tbsp - chopped
Garlic - 1 clove - smashed
Lemon juice - 2 tsp
Salt & Pepper to taste
Method:
Cook the pasta/noodles according to package instructions. Heat oil in a wide saute pan and add the smashed garlic and chopped fresh rosemary. When the garlic is cooked (but not burnt), remove it from the oil. Add the sliced mushrooms and saute until it is almost cooked. Add required salt and pepper. Add the cooked drained pasta, lemon juice and toss well in medium heat. Remove from heat and serve hot garnished with a small piece of rosemary.
Linking this up to PJ's Herbs and Flowers - Season 2.

Saturday, November 2, 2013

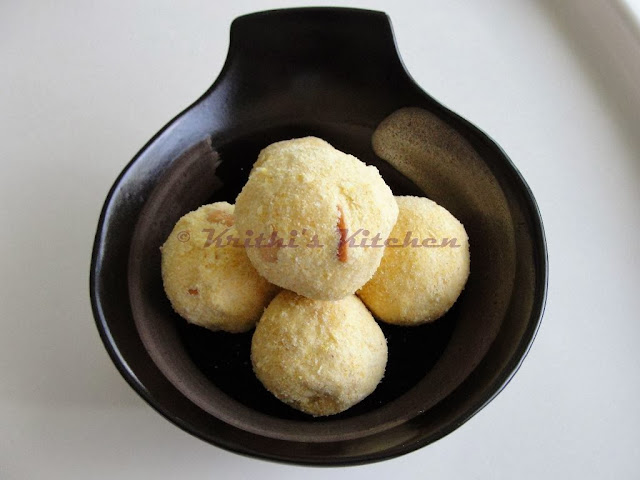
Pasiparuppu Urundai / Moong Dhal Ladoo - Wish you a Happy Diwali | Diwali Sweets Recipes

Wish you all a very Happy Diwali! Hope you are having lots of fun celebrating the festival with friends and family. Last year during Diwali we were relocating cross country, so I coould not make any sweets. This time I made Murukku, Ribbon Murukku, Jangiri and this Pasiparuppu urundai. If you are someone who are pressed for time then you should definitely make this one. With just 6 ingredients, it gets ready in 30 minutes and tastes like you have put a lot of effort into making them.
Ingredients:
Measurements in standard cup/spoon measurements; Makes about 16-18 lime sized ladoos
Yellow Moong dhal / Pasi paruppu - 1 cup
Raw Rice - 1 tbsp
Sugar - 1 cup
Ghee - 1/4 - 1/3 cup (as needed)
Cardamom - a pinch
Cashews - 10 - broken into little pieces

Method:
Dry roast the moong dhal and rice in medium heat until light brown. Transfer to a plate and allow to cool completely. Meanwhile powder the sugar and fry the broken cashews in a teaspoon of ghee. Process the moong dhal-rice to a fine powder. In a mixing bowl, add the moong dhal-rice powder, powdered sugar, cardamom and fried cashews. Mix well with a wooden spoon. Warm ghee in the same kadai which was used to fry cashews. When fully melted (should not boil, just warm), turn the heat off. Take about one-fourth of the dhal mixture and add 1-2 tsp of ghee or as required. Mix well with your fingers and try to make little lime sized balls, pressing tightly in your palm and fingers. If the mixture crumbles, add little more ghee and make ladoos. Super tasty moong dhal ladoos are done!
Linking this up to Spotlight - Festive Treats; Vardhini's Diwali Bash; Only - Diwali Treats by Pari.
Only Diwali treats

Friday, November 1, 2013

Ribbon Murukku / Ottu Pakoda | Indian Festival Recipes

Ribbon Pakoda aka Ribbon murukku are these super addictive crispy snacks grandma makes for Diwali. These lacy crunchies hold good for the saying "no one can eat just one" and we would have stuffed us well before even she finishes making these. This recipe here is for a spicy ribbon pakoda. Just skip the chillies part for a non-spicy one.
Ingredients:
Measurements in standard cup (240 ml) measurements; 
Soaking time - 4 hours; Preparation time - 15 mins; Cooking time - 90 mins
Parboiled Rice / Idli Rice - 2 cups
Roasted Gram dhal flour / Dalia / Pottukadalai maavu - 2 cups (see notes below)
Asafoetida / Hing / Perungayam - a big pinch
Butter - 1/2 tbsp
Salt - 1 tsp
Oil - for deep frying
Grind to a paste:
Green chillies - 6
Cinnamon - a mall piece
Cloves - 5
Ginger - 1/4" piece
Garlic - 6 cloves
Fennel Seeds /Saunf - 1/2 tsp
Method:
Wash and soak the rice for 4 hours. Grind to a smooth batter with salt with a pouring consistency. Grind the chillies and spices with about 1/4 cup of water. Filter this spice mixture to extract the juice. Add the butter to the gram dhal flour and rub to incorporate well. Add the rice batter to gram dhal flour and mix well. The mixture would be little dry. Now add asafoetida and sprinkle the chilli juice and knead well to form a smooth dough. Heat oil for deep frying. Prepare the murukku press by placing the ribbon murukku attachment. Fill with dough and pipe directly into the hot oil. Flip over midway and fry until the bubbles around the murukku in the oil subside. Remove and drain into a paper towel. When cool store in an air-tight container.
Notes:
Process 2 cups of roasted gram dhal to a fine powder. Pass it through a sieve and remove the bigger pieces. Measure out 2 cups of the flour.
You could also use about 1 tbsp of chiili powder instead of the green chilli juice. Use water to make the dough if using chilli powder. These murukkus will be darker than the ones in the picture.
Linking these up to Only - Diwali Snacks event by Pari and Sowmya; Taste of Tropics - Chiles and Vardhini's Diwali Bash; Spotlight - Festive Treats.
Only Diwali treats