Pages

Wednesday, September 28, 2011

Roasted Potatoes Spiced with Curry Leaves

I am making great use of the "curry leaves season".. Yes it is a season here in the US where curry leaves may no more be available in the winter. After making Podis and Chutneys I used the leaves in the Roasted potatoes with Indian spices for a wonderfully aromatic side dish. Potatoes are one versatile food which can be cooked in infinite ways and would taste great every time. I kind of did an experimenting preparation with boiled potatoes and the spice mix with curry leaves and the outcome was simple awesome. Do check out my other Roasted potato dish here.


Ingredients:
Potato - 3 big ones - boiled with salt and cubed
Salt - to taste
Asafoetida - a pinch
Oil - 3 tbsp
Spice mix:
Curry leaves - about 40 (from 3 twigs)
Coriander seeds - 1 tbsp
Chana dhal - 1 tbsp
Urad dhal - 1/2 tbsp
Pepper - 1/2 tsp
Cumin seeds - 1/2 tsp
Dry Red chillies -2
Raw rice - 3/4 tsp


Method:
Dry roast all the ingredients under spice mix except curry leaves in medium heat. The spices are done roasting when the rice changes to a yellow color. Allow it to cool. In the same pan roast the curry leaves until they become dry and the sound resembles the rustle of dry leaves. But make sure the color is still green and not brown. Grind it with the cooled spice mix in a mixie or blender to a fine powder. Heat oil in a wide non-stick pan and add the asafoetida. Add the boiled cubed potatoes and mix well so that the oil gets coated all over the potatoes. Let it roast for about 2 to 3 mins. Add the ground spice mix and salt and mix well. Cook further for 7 to 10 mins in med-high heat mixing occasionally till a crust forms on the potatoes. Serve hot with rice. Perfect side dish for rasam/yogurt rice.


Sending this to Herbs & Flowers - Curry Leaves event by PJ.

Monday, September 26, 2011

Beans Poriyal / Beans Thoran / Easy String Beans Stir-Fry - South Indian Style

As I had promised in my Bread Upma post I have been posting few recipes regularly on the tag "Quickies/Bachelor Cooking". There are 20+ recipes under this label currently which enables newbies in the kitchen to whip up tasty dishes. These are easy to make for anyone who is running against time. So here is my new addition in the tag. Beans Poriyal/Thoran here is a basic easy to make thoran for beginners in South-Indian cooking. I have made two types of poriyal. One with a simple tempering and garnishing with coconut and the second one seasoned with spice powders. The first method can be taken as the basis of most of the vegetable poriyals. One could substitute Carrots, Beetroots, Cabbage, Long Beans, Broccoli, Spinach in the place of beans, except that the pre-cook time of the vegetables vary. 

Type 1: Beans Thoran / Beans Poriyal
Preparation time: 15 mins; Serves - 2
Ingredients:
Beans - 1/2 lb - Chopped fine - 1 1/2 cups
Oil - 1 tsp
Mustard seeds - 1/4 tsp
Urad dhal - 1/2 tsp
Chana dhal - 1/2 tsp
Green chillis - 2
Curry leaves - 2
Grated coconut - 1 1/2 tbsp (Can substitute unsweetened dry coconut powder)
Salt - 1/4 tsp or to taste
Method:
Steam the chopped beans until tender. Aternatively it could be cooked in microwave with a tsp of water for 2 mins. Heat oil in a non-stick pan and add the mustard seeds to splutter. Add the mustard seeds and chana dhal and cook in medium heat until the chana dhal is roasted and changes to light brown in color. Add the split green chillis and curry leaves. Throw in the cooked beans and salt and mix well. Heat for about 3 to 4 mins in medium-high heat. Remove from heat and mix the grated coconut. The whole stove-top process takes a maximum of 10-12 mins.
Note: Use of coconut is optional in this recipe. But I strongly suggest not to skip since it gives the authentic taste.
Type 2: Beans Mezhukupuratti
Preparation time: 20 mins; Serves - 2
Ingredients:
Beans - 1/2 lb - Chopped fine - 1 1/2 cups
Oil - 1 tbsp
Mustard seeds - 1/4 tsp
Urad dhal - 1/2 tsp
Chana dhal - 1/2 tsp
Curry powder - 1 tsp - Available in Indian Grocery Stores
Coriander powder - 1/4 tsp
Chilli powder - 1/4 tsp
Curry leaves - 2
Salt - 1/4 tsp or to taste
Method:
Heat oil in a non-stick pan and add the mustard seeds to splutter. Add the mustard seeds and chana dhal and cook in medium heat until the chana dhal is roasted and changes to light brown in color. Add the curry leaves and add the chopped beans. Cook for about 4 to 5 mins in med-high heat stirring occasionally. Add the chilli powder, curry powder, coriander powder, salt and mix well. Add about a teaspoon of water and continue to cook for another 7-8 mins in medium heat until the beans are cooked through and the spices are well infused. 
Note: Sambhar powder can be substituted for curry powder in this recipe. Just play around with the proportion of the spice powders used here.
I am sending this to Flavors of South India event by Nayna and to Life is Green event by Shilpa.

Thursday, September 22, 2011

Dried Figs and Dates Spicy Jam

Dried Figs (Athipazham in Tamil) are one of our favorite dry fruits. We always stock up on dried figs and dates and it is our most easy to reach pastime snacks. I always put it up on the center of our dining table. Yesterday I picked few of 'em and made this simple and delicious jam. I added ginger and chilli to give a little kick since I didn't want it to be too sweet. Addition of cinnamon gives a warm and spicy undertone to the jam. I am planning to buy extra figs next time and make this more often.


Ingredients:
Preparation time - 30 mins; Yields - about 2 cups; 
Dried Figs - 1 cup (about 10)
Dates - 1/4 cup (seeded and halved)
Maple Syrup - 1/2 cup (can substitute 1/2 cup of honey)
Ginger - Grated finely - 1 tbsp
Ground Cinnamon - 1/4 tsp
Dry red chilly -1 (seeds removed)
Lemon juice - 1/2 tsp
Method:
Heat 1 cup of water with the figs and allow to boil. Remove from heat and keep it covered for 15 mins until the figs are plump. Fish out the figs and allow it to cool on a cutting board. Add the dates to the water and set aside for 5 mins. Drain the water and keep it aside. Remove the ends of the figs and cut into 4 pieces. The cut figs should measure upto 1 1/2 cups. Add the dates and the chopped figs to a blender/food processor with the chilli and ginger. Pulse it into a not-so smooth consistency. You could use up the reserved water to help the pureeing process. Heat the maple syrup and cinnamon powder in a non-stick saucepan and add the mashed fig and dates. Cook in medium heat stirring with a wooden spoon once in 2 mins. The jam would be done in about 12-15 mins. Remove from heat and add the lemon juice. Cool and transfer to a dry air-tight container. Serve with toast or any flat-bread. Makes a great spread for chapathis too.

Sending it to Breakfast Club - Preserves event by Helen, B2B - Basic Chutneys event by Jaya and to HLI-Dates event by Aarthi and Kalyani.
Breakfast-Club-logo

Sending this to Srivalli's Kid's Delight hosted by Nupur of UK-Rasoi, for the month of April 2012.

Tuesday, September 20, 2011

Baingan Bhartha / Roasted Brinjal Curry | Indian Curry Recipes

This recipe had been lying on my drafts for nearly 6 months now. I don't know how it had gone unnoticed. We love eggplants in any dish. Be it a traditional South-Indian Ennai Kathirikkai Kulambu or the exquisite Italian Eggplant Parmigiana we always cant say no to it. I made this Baingan Bharta as a side-dish for chapathis. 
Ingredients:
American Eggplant / Large Brinjal - 1 lb
Onion - 1 med sized  - chopped fine
Tomato - 2 med sized - chopped fine
Green Bell pepper  - 1/2 - chopped
Coriander powder - 1 tsp
Chilli powder - 3/4 ts
Turmeric powder - 1/4 tsp
Cumin powder - 1/2 tsp
Cumin - 1/2 tsp
Asafoetida/Hing - 1/4 tsp
Oil - 2 tsp + 1 tsp
Salt - to taste
Coriander leaves / Cilantro - For garnish
Method:
Preheat the oven to 400 F. Apply oil over the eggplant and roast in the oven for about 45 minutes. When done, the skin will be charred. Allow it to cool to a temperature when you can handle and peel the charred skin off and discard. Mash the flesh roughly and save. In a wide bottomed non-stick pan, heat oil. Add the cumin seeds and hing and fry for about 20 secs. Add the chopped onions and fry until it turns transparent. Now add the chopped tomatoes and fry until it turns mushy. Add the turmeric powder, chilli powder, coriander powder and cumin powder. Saute further for a minute and add the bell pepper, eggplant, salt and mix well. Cook for another 5 mins in medium heat. Garnish with cilantro and serve with hot rotis/phulka or as a spread for bread.
Tip: To speed up the cooking of tomatoes add a tad bit of salt and cook in medium-high heat.
Sending these easy to make earthy curry to Food Palette Series - Finale.


Sunday, September 18, 2011

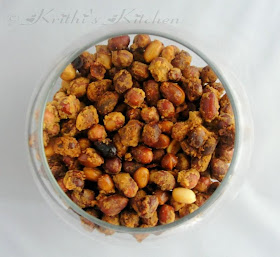
Microwave Masala Kadalai / Savory Crusted Peanuts in Microwave

We all love peanuts. Salted boiled peanuts is my personal favorite way of munching peanuts, although peanut butter and this masala peanuts are the close next. Nuts are my favorite way of snacking and I always stock up on Almonds, Walnuts and Peanuts. Did you know that peanut is not actually a nut but belongs to the legume family. But still it has the highest protein content than other nuts. Peanuts is also high in anti-oxidant content, richer than in Green Tea!! 
Masala Kadalai is generally a deep fried snack. I used MW but still came up with the same taste and crunch but in only 15 mins from scratch to end with very less oil. This can be made real quick when you are craving for something crunchy. This is adapted from Mallika Badrinath's South Indian Microwave Cooking Cookbook.
Ingredients:
Cooking time - 15 mins; MW power - 900W
Raw Peanuts (shelled) - 1 1/2 cups
Besan/Kadalai Maavu/Chick Pea Flour - 2 tbsp heaped
Rice Flour - 1 tbsp - heaped
Chilli powder - 1 tsp
Cumin powder - a big pinch
Salt - 1/2 tsp or to taste
Water - as required
Oil - 4 tbsp

Method:
In a wide bottomed glass (or any microwave-proof) bowl heat the oil in Microwave oven for 4 mins. Meanwhile, mix the peanuts, besan, rice flour, chilli powder, cumin powder and salt. Sprinkle water a teaspoon at a time and mix. Repeat until the mixture is coated all over the peanuts and resembles a crumble. Add the mixture to the hot oil and mix until the oil is coated all over. Microwave for 6 minutes stirring once in between. Allow 3 minutes of standing time (Leave in the microwave for 3 minutes undisturbed after it is done). Perfect snack with a cup of tea.
I am sending this to MEC - Teatime snacks event by Srivalli, MLLA- #39 event by SusanKid's Delight - Party Snacks, Flavors of South India and to Let's Cook - Hibernative Foods.

Tuesday, September 13, 2011

Bhindi Sambhariya / Stuffed Okra - Gujarati Style

The day I saw this awesome and attractive Gujarathi Style Stuffed Okra (Bhindi Sambhariya) in Sailu's space I made this. I had washed some okra and had placed it over the kitchen counter for chopping. When I was engaged in my usual morning routine of blog-hopping, came across this eye-catching tantalizing dish. I have made it twice since then and have loved it more each time. 
Ingredients:
Preparation time - 20 mins; Cooking time - 30 mins;
Okra/Bhindi/Lady's Finger - about 30 - 35 tender ones
Oil - 2 tbsp
Asafoetida/Hing - 1/2 tsp
Curry leaves - a few
Sending this to Susan's Black & White Wednesday
For the stuffing:
Green chilli - 3
Ginger - 1" piece
Roasted Coriander powder - 1/2 tbsp
Roasted Cumin powder - 1/2 tsp
Garam masala powder - less than 1/4 tsp
White/Brown Sugar - 1 tsp
Grated Coconut - 3 tbsp
Coriander leaves - from 4 twigs - finely chopped
Peanuts - roasted and crushed coarsely to a powder - 2 tbsp
White Sesame seeds - 1/2 tbsp
Oil - 1/2 tbsp
Salt - to taste

Method:
Grind green chillies and ginger to a paste adding a tsp or so of water. In a small bowl mix ginger-green chilli paste, cumin powder, coriander powder, garam masala powder, sugar, coconut, coriander leaves, ground peanuts, sesame seeds, salt and oil. 
Cut the head and ends of the okras and use a paring knife to make a slit vertically from the top to upto three-fourth of the way down. Take care that you do not split it open. Take about a tsp size of stuffing and stuff in the okras. Heat oil in a wide mouthed pan and add the hing and curry leaves. Place the stuffed okras on the pan without overlapping each other. Cook in med-low flame turning over once in a couple of minutes until all sides are done. It takes about 30 mins to cook through. Serve as a side for rice or roll it in a roti for okra khatti rolls. Great as a appetizer/finger food too.
Note: When you check for taste in the stuffing, the mixture should be salty because we are not going to salt the okras separately.
I am sending these to Bookmarked recipes - Every Tuesday event by Aipi & Priya. Also to Life is Green by Shilpa and Food Palette Finale - Rainbow Colors by Akheela.


Sunday, September 11, 2011

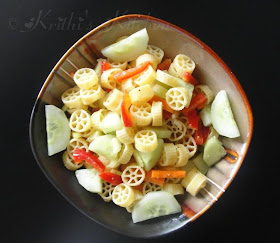
Pasta salad with Lemon and Peanut dressing

Come Summer I am going more towards anything light for lunch. And that means soups and salads to the rescue. I love salads with lots of colorful veggies and something substantial like pasta or paneer to make a whole meal in itself. The lemon peanut dressing in this salad is very simple yet gives a lot a flavour combined with the Extra Virgin Olive Oil. 
Ingredients:
Serves - 3 or 4
Pasta - any short cut variety like rotelle - 2 cups
Chopped Vegetables -1 to 1 1/2 cups - I used chopped celery, carrots, cucumbers and red bell peppers
For the dressing:
Extra Virgin Olive Oil (EVOO) - 1/4 cup - Oriental sesame oil can be used
Fresh Lemon juice - 3 tsp
Lemon zest - from one lemon
Brown sugar - 1/2 tsp
Peanuts - roasted and crushed - 2 tbsp - Black sesame seeds can also be used
Salt and pepper to taste
Method:
Cook the pasta in salted boiling water until al-dente (cooked but not too soft). Drain and set aside. Dry roast the peanuts until toasted. Allow to cool and remove the skin. Pulse in the blender until coarsely powdered. For the dressing, whisk together the EVOO and lemon juice until frothy. Add the lemon zest, brown sugar, crushed peanuts and salt and pepper. Mix thoroughly and set aside. Mix the cooked cooled pasta and the chopped vegetables. Top the salad with the dressing when ready to serve. Give a gentle toss and serve in individual bowls.
Note: This salad is super tasty and absolutely satisfying. Practically any vegetable can be added. The pasta may be rinsed after draining. Technically rinsing the pasta after cooking is not recommended since the resident starch in the pasta allows the sauce to stick to the pasta and impart greater flavor. But for pasta salads, you may rinse the pasta to avoid the extra starch.
Check out my other Soups and Salad recipes here.
I am sending this to Monthly Mingle - Scintillating SaladsB2B - Basic Chutneys and to Fast Food to Fat Food event.
Sending this to Srivalli's Soups and Salads Mela

Thursday, September 8, 2011

Kadalai Paruppu & Ellu Poorana Kozhukattai / Steamed Stuffed Rice dumplings

I am a little late in posting the kozhukattai/kadubu I made for Vinayaka Chaturthi. Trust everybody had a great celebration. I had a good one. Made two types of sweet and one savory kozhukattai along with black sundal for the neivedyam. This is my first attempt in making kozhukattai on my own and it came out well for a first timer. Since this was a traditional recipe I had been trying to gather as many tips and techniques for the preparation. Got my sister's advice on making the outer covering. Kadalai paruppu / Split chick peas was the traditional filling for kozhukattai we grew up with, so I stuck to that one. I had been really nervous for I had to make without tasting or sampling (offering to God first). But the measurements below works really perfect. I also tried to take step-by-step pictures when I made the second batch.
Preparation Work:
All the cup measurements here refer to the rice cooker measurement cup approx 170 ml
For the outer covering:
Raw rice/Pacharisi - 3 cups
Salt - 1 tsp
Gingelly oil - 1 tbsp + as needed
Water - to grind the rice
Method:
Wash and soak the rice for 2 to 3 hrs. Grind it in a blender with salt and water until smooth. The batter can be runny. Heat a non-stick pan in medium heat with 1 tbsp. Pour the rice batter and mix with a wooden spoon in med-low heat. Mix until the water dries out and the rice comes together as a dough. Remove from heat, apply oil all over and keep covered. Keep a close eye on the batter when on heat and mix continuously as parts of it tend to dry out soon.
Cooking the Dhal/Kadala paruppu:
Split Chick peas/Chana dhal/Kadala paruppu - 1 cup
Salt - a pinch
Water - 3 cups
Method:
Wash and soak the dhal for 30 mins. Cook with 3 cups of water and a pinch of salt. When done the dhal should be mashed when pressed but should still hold its shape. Alternatively, you could wash and pressure cook for 2 or 3 whistles. The dhal should not be soaked if pressure cooking.
Filling:
1) Paruppu Sweet :
Split Chick peas/Chana dhal/Kadala paruppu - cooked - 1 cup
Jaggery - grated - loosely packed - 1 cup
Grated Coconut - 2 tbsp (fresh or frozen)
Method:
Pulse the ingredients together in a blender/mixie for a couple of seconds until the mixture has a coarse texture.
2) Paruppu Savory:
Split Chick peas/Chana dhal/Kadala paruppu - cooked - 1 cup
Vegetable oil - 1 tbsp
Mustard seeds - 1/2 tsp
Green Chilli - 2 - chopped fine
Curry leaves - 4
Asafoetida/Hing - 1/2 tsp
Salt - 1/4 tsp
Method:
Pulse the cooked cooled dhal and salt together in a blender/mixie for a couple of seconds until the mixture has a coarse texture. Heat oil in a pan and add the mustard seeds, asafoetida, curry leaves and green chilli. Saute for a minute and pour the tempering over the dhal mixture and mix uniformly.
3) Sesame sweet:
White Sesame Seeds/Ellu - 1/2 cup (Can use black sesame seeds as well)
Jaggery - grated - tightly packed - 1/2 cup
Grated Coconut - 1 tbsp
Method:
Pulse the ingredients together in a blender/mixie for a couple of seconds until the mixture has a coarse texture.
Putting together/Making the kozhukattai:
Take a working board and place a plastic sheet on it. Apply some oil over it. Pinch a small lemon sized ball of the rice mix and flatten it on the plastic sheet. Take a teaspoon of the filling (anything of the above 3) and place it in the center. Fold the plastic sheet over to make a half-circle. Press the edges to seal it completely. Use the finger tips to press and remove the extra dough from the edges.
Place the prepared kozhukattais in a steamer plate without overlapping. I used my idli plates. Steam for 10 mins. Repeat for the rest of the dough and filling. To check for done-ness see if the top of the steamed kozhukattais is glossy. In the below picture the photo on the right shows the cooked kozhukattais which look shiny. Remove from heat and allow to cool in the steamer plate for 10 mins and then serve warm. This is THE favorite offering/neivedyam of Lord Ganesh.
Mani/Ammini Kozhukattai:
Mani means tiny beads and these little kozhukattais are prepared with the left over rice dough. The process is pretty simple. Make small blueberry/seedai sized balls of the dough and steam for about 7 to 10 mins. Mix with the leftover kadala paruppu savory pooranam/filling. Serve warm.
Note:
You could grind the rice batter and cook the chana dhal and store it in the fridge the previous day. This makes the life easier to spend less time while preparing during the pooja day. I also grate jaggery in advance and store it. Also check out the easier version here - Pidi Kozhukattai.
I am sending this traditional kozhukattais to Serve It - Steamed event happening here and co-hosted by Denny. And also to FSF-Janmashtami and Ganesh Chaturthi event by Vatsala and Sonia and Flavours of South India event by Nayna.

Also sending this to Akila's Dish Name Starts with K